Frayed resistance bands: when is it safe to use them?
A frayed latex band does not become dangerous on a single, predictable birthday. Age and normal use can gradually degrade latex, but visible damage, overstretching, heat, and poor storage can accelerate that process.
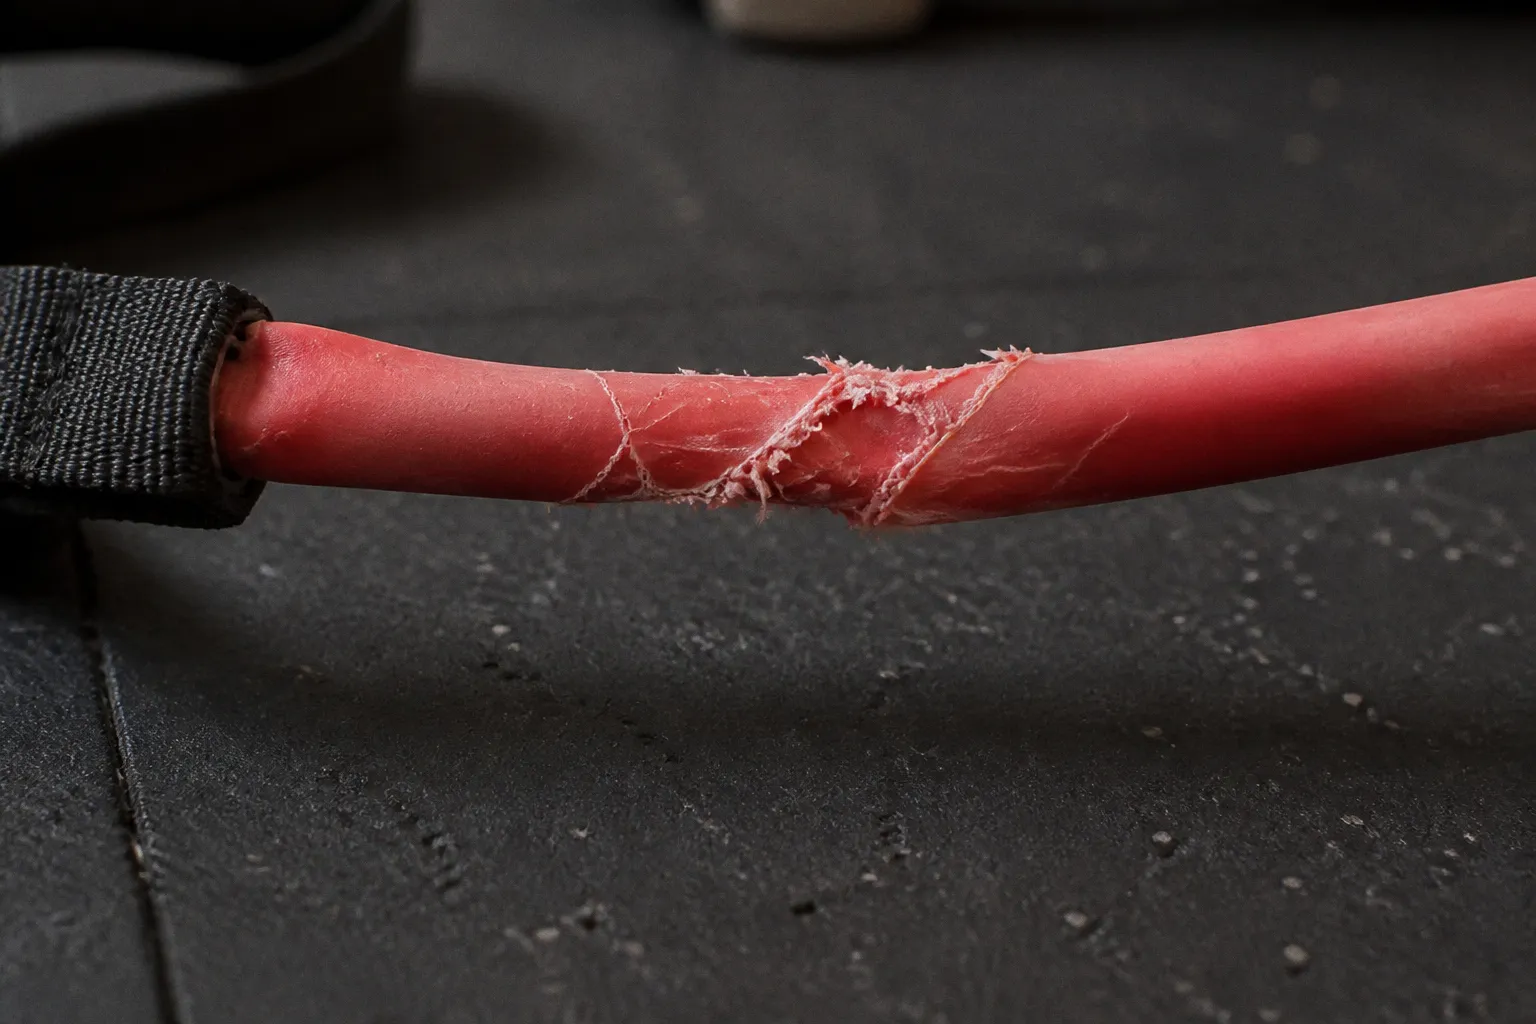
The important question is not how old the band is. It is whether the material still has enough structural integrity to handle tension safely.
That little patch of fuzz you have been side-eyeing for the last three months is not automatically a badge of honor. It may be harmless surface wear on a fabric band, or it may be the first visible sign of a damaged load-bearing layer. Those are very different situations. The material, the location of the wear, and the way the band behaves under light inspection all matter.
Latex and rubber bands can fail suddenly when a cut, abrasion, or series of microtears concentrates force in one small area. When that happens, the stored energy in the stretched band is released in a fraction of a second. There may be no useful warning sound, no graceful loss of tension, and no time to move your face out of the way.
I have worked with plenty of clients who treated resistance bands like permanent fixtures of the home gym: bands hanging in garage heat, bands tossed into car trunks, bands with rubber peeling off in little curls while the user continued to insist they felt fine. You may feel fine right up until the moment the band stops being fine.
A damaged resistance band is not broken-in. It may be on its way to breaking.
The Mechanics of Failure: Why Fraying Leads to Snapping
Rubber and latex distribute tension relatively evenly when their surface and internal structure are intact. The polymer chains stretch across the material and share the load. A nick, cut, deep abrasion, or developing microtear interrupts that continuity. The damaged area then carries force less evenly, creating what engineers call a stress concentration or stress riser.
The mental shortcut is a perforated tear line on a sheet of paper. You do not need much force to start the rip once the paper has already been weakened along a path. A small surface cut on a latex band can work in a similar way: each stretch can extend the damage, and the next high-load repetition may turn a barely visible flaw into a complete tear.
That does not mean every mark on every band is an immediate failure point. A superficial scuff is not the same as a cut that penetrates the elastic material. A few loose fibers on the edge of a woven fabric loop are not the same as a section where the load-bearing weave has opened up. The problem is that the difference can be difficult to judge once wear has progressed.
Look particularly closely at:
- Cuts or notches across the width of a latex band. Damage that crosses the direction of tension can spread quickly.
- Longitudinal splits and peeling. A band separating along its length may be losing its structural continuity even if it still stretches.
- Tiny cracks, pinholes, or clusters of surface lines. These can be early signs of resistance band microtears.
- Sticky, hard, chalky, or unusually glossy areas. A change in texture can indicate that the material is aging unevenly.
- Damage at anchor or contact points. Repeated rubbing against a rough edge can create a weak section that is easy to miss.
- Uneven recovery after stretching. If one section remains elongated or looks thinner than the rest, treat that as a warning rather than a quirk.
The other piece people underestimate is stored energy. A stretched resistance band is loaded. When it releases, it does not simply go limp; it can recoil toward the anchor, the handles, or the person holding it. That is why a snap can cause more than a small bruise. Facial injuries, cuts, and eye injuries are all plausible outcomes when a band fails during a loaded movement.
The risk increases when the band is used near the head, when the anchor point is unstable, or when another person is standing in the direct line of recoil. A band used for a lower-body exercise may still be capable of causing injury if it slips from a foot or anchor. Positioning does not repair damaged material; it only changes the consequences if that material lets go.
So when we ask when it is safe to use frayed resistance bands, the underlying question is: what does the fraying represent? If it is only loose surface fiber on a woven band, the answer may be different from the answer for a latex tube with a split underneath. If you cannot confidently tell the difference, the uncertainty is itself a reason to retire the band.
Latex vs. Fabric: Distinguishing Cosmetic Wear from Structural Damage
Not all resistance bands are built the same, and treating a fuzzy fabric-woven band like a damaged latex tube can lead to unnecessary replacement. The opposite mistake is more serious: treating a deteriorating latex band as though every visible mark were cosmetic.
The construction of the band determines what you are actually inspecting. In a latex loop, the elastic material is the load-bearing structure. In a fabric band, the weave and stitching carry much of the mechanical load, while the fabric may also contain elastic fibers. In a latex tube with an outer sleeve, the sleeve can help contain fragments after a failure, but it does not make the inner tube immune to wear.
| Material | Wear that may be cosmetic | Signs that call for replacement | Why it matters |
|---|---|---|---|
| Plain latex or rubber loop | Very light surface scuffing without a cut, texture change, or loss of elasticity | Any visible cut, split, peeling, deep abrasion, sticky or hard area, or uneven thinning | The elastic material itself carries the load, so damage directly affects strength |
| Latex tube with an anti-snap sleeve | Minor fuzzing or pilling on the outer sleeve while the tube underneath remains intact and supple | Exposed inner rubber, damage to the tube, torn stitching, a stretched sleeve, or hard and sticky sections | The sleeve may help contain a broken tube, but it does not prevent internal degradation |
| Woven fabric loop | Light pilling, a few loose edge fibers, or mild surface roughness | Opened weave across the load path, broken stitching, substantial fraying, baggy sections, or loss of recovery | The weave and stitching are part of the structure; once they loosen, the band may not distribute load properly |
| Tube band with foam handles | Scuffing or compression on the foam grip | Any cut, split, sticky patch, crystallized area, or severe discoloration on the tube | Foam wear is usually a comfort issue; tube wear is a load-bearing issue |
A useful inspection should not be limited to looking at the band from a distance. Run your eyes along the entire length, especially near handles, seams, anchors, and sections that rub against the floor or a door attachment. Do not aggressively pull a questionable band to see whether it fails. The inspection should reduce risk, not create a final stress test.
What cosmetic wear usually looks like
Fabric bands can develop a fuzzy surface from friction. A few loose threads along the edge may not mean that the central weave has failed. Pilling on a sleeve can also be superficial. If the band remains symmetrical, returns to its normal shape, and has no open areas in the load-bearing section, that type of wear may be cosmetic.
Even then, location matters. Fraying on a decorative edge is less concerning than fraying across the part of the band that stretches under load. A loose thread caught in stitching can also become a route for further unraveling. Trim the loose thread only if doing so does not disturb the seam, and do not treat tidying the edge as a structural repair.
What structural damage looks like
Latex is less forgiving. A visible cut or split in the elastic material is not made safe by the fact that the rest of the band looks new. The same applies to a tacky patch, a brittle section, or a place where the surface has started to peel. These changes suggest that the material is no longer behaving uniformly.
Color change deserves context rather than panic. Latex can discolor with age and exposure, and discoloration alone does not prove that the band will fail immediately. But a color change combined with altered texture, cracking, stickiness, or reduced recovery is a strong reason to stop using it. Treat the combination of signs, not one isolated cosmetic difference, as the meaningful evidence.
Anti-snap sleeves create a common false sense of security. They can reduce the distance that a broken tube travels, but they do not stop the tube from breaking. Inspect the elastic underneath whenever the design allows it, and inspect the sleeve for stretched stitching, holes, and areas that have shifted away from the tube. A sleeve that has lost its containment function is not a substitute for a healthy band.
If a latex or rubber tube has visible structural damage, put it in the trash rather than the donation pile. Passing a questionable band to another person does not remove the risk; it only moves the decision to someone who may know less about its history.
The Dangers of DIY Repairs and Overstretching
For almost every piece of fitness equipment, there is a forum thread suggesting electrical tape, superglue, heat, or a fifteen-second tutorial as a repair. Resistance bands attract these fixes because the damage looks simple. The material is flexible, the tear is small, and throwing the band away feels wasteful.
The problem is that a repair can change the way force moves through the band without restoring the original structure.
Tape may hold a loose outer sleeve in place, but it should not be treated as a repair for damaged latex. Adhesives often bond poorly to flexible rubber and latex, and a rigid patch can create a new stress concentration at its edges. Under repeated stretching, the adhesive may shear, peel, or leave a hard section that bends differently from the surrounding material.
Stitching a fabric patch over a damaged elastic band is not a reliable restoration either. It can cover the visible flaw while leaving the underlying fibers weakened. Sewing through latex can add punctures; sewing over a woven band can place new stress around the holes. A repair may be acceptable for a non-load-bearing cover, but not as a reason to return compromised elastic to heavy use.
Wrapping a torn tube tightly is particularly poor risk management. The wrap can hide the damage, interfere with inspection, and create a projectile if the underlying tube fails. If you cannot see the material clearly, you cannot verify that the repair is holding.
Overstretching is the quieter, more common version of the same mistake. Resistance bands are designed to operate within a particular range of extension. Pulling a band farther than the manufacturer allows increases the load on the polymer and may speed up fatigue, especially when the practice is repeated. A new band is not exempt from this rule, and an old or damaged band has even less margin.
Use the manufacturer’s stated maximum extension when it is available. If it is not, do not make a habit of pulling the band to its absolute limit. A practical setup leaves enough travel for controlled repetitions without forcing the band into an extreme, thin, highly loaded state.
The short list of band-killing mistakes shows up repeatedly in home training:
1. Using a band in a partner-assisted stretch when someone is in the recoil path. If the band or anchor fails, the other person may be directly exposed to the release.
2. Anchoring the band against a sharp door edge or rough fixture. Repeated contact can cut into the same point until the damage becomes difficult to see.
3. Pulling to maximum length simply to feel the highest possible resistance. This adds stress without necessarily improving the exercise.
4. Doubling bands without checking the anchor and load path. The bands may not share tension evenly, and one can slip or fail before the other.
5. Leaving a band stretched on a hook between sessions. Constant tension can contribute to fatigue and keeps the material under load when nobody is supervising it.
6. Using a foot as an improvised anchor without controlling the line of recoil. If the band slips, it can travel toward the body or face.
7. Continuing after a band has changed texture. A sticky or brittle section is not something to work around by simply using a lighter resistance.
The goal is not to make every workout feel like a laboratory procedure. It is to stop treating elastic equipment as indestructible because it is inexpensive and quiet.
Environmental Factors That Accelerate Material Degradation
Your bands are not outdoor equipment. That should be obvious, except it is not. Home users routinely leave them in garages, on balconies, in bright windows, or in hot car trunks because the equipment is small and easy to ignore.
Latex and rubber are polymers that can degrade through exposure to heat, ultraviolet light, ozone, moisture, and certain chemicals. The exact rate depends on the material, formulation, use, and storage conditions, but the direction is not mysterious: repeated exposure generally gives the band less room for error.
A sunny windowsill can expose latex to ultraviolet light for hours each day. A hot vehicle can subject it to temperatures far beyond the conditions of a cool indoor drawer. Ozone from some electrical equipment and air-cleaning systems may also contribute to rubber deterioration. Contact with oils, solvents, chlorine, and harsh cleaning products can alter the surface and make the material less predictable.
That does not mean one afternoon in a warm room destroys a band. Degradation is usually cumulative. A band that is occasionally exposed to heat may remain usable, while a band stored for months in heat and sunlight can age much faster. Likewise, a six-month failure does not by itself prove that the band was badly made or badly stored. It may reflect a combination of manufacturing variation, heavy use, overstretching, abrasion, environmental exposure, or an unnoticed defect. The useful response is to examine the failure pattern and storage history rather than assign a single cause without evidence.
Typical service life varies widely. A quality latex band used a few times a week and stored well may last for years, while a heavily used band in a commercial or poorly controlled environment may need replacement much sooner. Manufacturer guidance is the best starting point, but it is not a guarantee. A calendar can remind you to inspect the band; it cannot override visible damage.
Storage and care that make sense
- Store bands in a cool, dry, dark place. A drawer or storage box is usually better than a wall hook beside a bright window.
- Keep latex away from oils and petroleum-based products. Hand lotions, massage oils, and some household products can leave residues that are not friendly to rubber.
- Clean with a damp cloth and mild soap when needed. Follow the manufacturer’s instructions, and avoid assuming that alcohol, bleach, or disinfectant wipes are compatible with latex.
- Let the band dry before storing it. Persistent moisture and trapped residue can contribute to surface problems, especially in a closed bag.
- Do not leave bands stretched between workouts. Return them to a relaxed position and avoid sharp folds or tight knots.
- Keep them away from heaters, radiators, hot tubs, and prolonged direct sun.
- Inspect anti-snap sleeves and stitching as well as the elastic. A sleeve with torn seams may not contain a failed tube effectively.
- Use padding at contact points. Rough concrete, splintered wood, sharp metal, and burrs can create abrasion that develops gradually.
- Keep chlorine and pool chemicals away from latex whenever possible. A band used around a pool should be cleaned and dried according to the manufacturer’s guidance rather than left wet in a gear bag.
Treat resistance bands as consumable equipment, not permanent fixtures. They can last a long time, but they do not last forever.
The price of a replacement band is small compared with the inconvenience of an avoidable injury. That is not a reason to discard every piece of equipment at the first sign of fuzz; it is a reason to take the material seriously enough to distinguish surface wear from structural damage.
Establishing a Replacement Schedule for Your Home Gym
The question behind the question is not only whether the band is safe today. It is how to avoid making the same uncertain decision before every workout.
A replacement schedule helps, but it should be based on use and condition rather than a rigid date. A home user training a few times a week, storing the band indoors, and using it within the recommended range may get years of service. A band used daily, stretched aggressively, exposed to heat, or dragged across rough surfaces may need to retire earlier. The calendar is a prompt to inspect, not a permission slip to continue using a damaged band.
For a practical home-gym routine, inspect the bands:
- when you first unpack them;
- before demanding exercises or high-tension movements;
- after cleaning or moving them to a new anchor;
- whenever the texture, color, or recovery feels different;
- at regular intervals, even if the band appears fine.
A useful inspection takes only a minute. Check the full length under good light. Look for cuts, pinholes, cracks, peeling, uneven thinning, and areas that have become sticky or hard. Stretch only a healthy-looking band gently enough to observe whether it extends evenly and returns to its original shape. Do not perform a maximum stretch as a test. If the band has a sleeve, look at the sleeve and the elastic separately.
Retire a band immediately when:
- the elastic has a visible cut, split, or deep abrasion;
- the material is sticky, brittle, chalky, or cracked;
- a section has become permanently stretched or visibly thinner;
- the band does not recover evenly after normal use;
- a fabric band has an opened load-bearing weave or damaged stitching;
- an anchor point has worn through the tube or sleeve;
- you cannot determine whether the damage is superficial or structural.
Do not try to solve structural damage by using less resistance. A damaged band may fail under a lighter load, particularly if the defect is concentrated in one spot. Do not move it to an exercise near the face, use it only for warm-ups, or give it to a beginner. The load may be lower, but the material is still compromised.
You can reduce the consequences of a failure by changing your setup: keep the recoil path away from your face, use a stable anchor, avoid wrapping the band around sharp surfaces, and do not allow another person to stand in line with the band. Those precautions are worthwhile with healthy equipment. They are not a justification for keeping a visibly damaged band in service.
So, when is a frayed resistance band safe to use? Fraying may be cosmetic when it affects only the surface of a fabric-woven band and the load-bearing weave, stitching, elasticity, and recovery remain intact. Even then, monitor it because surface wear can progress.
For latex or rubber tubes and loops, visible fraying, cuts, peeling, cracking, sticky patches, hard spots, or uneven thinning should be treated as structural warnings. A sleeve can contain fragments but cannot restore a weakened tube. A patch, glue, or lighter workout cannot reliably return the band to its original strength.
Latex can degrade with age and normal use, and storage conditions can speed that process. But there is no need to prove exactly why a questionable band is failing before replacing it. If the material no longer looks or behaves consistently, retire it.
Buy the replacement. Keep the old band out of circulation. The cost is predictable; the recoil is not.